
Have you ever wanted something to happen just before it happens? Like a magician anticipating teh applause before the trick’s grand reveal, or a web page knowing when it’s about to become visually crucial, before it even scrolls into full view? That anticipation is at the heart of something powerful and subtle within the modern web progress toolkit. Enter the rootMargin: '200px 0px 200px 0px' of the Intersection Observer API, a seemingly cryptic string holding the key to pre-emptive action and smoother user experiences. Forget simply detecting when an element is visible; this is about seeing beyond the horizon, about blurring the boundaries of what’s “in view,” and triggering behavior with calculated grace. Let’s peer under the code hood and uncover the magic behind this particular string,exploring how it elegantly shapes the interaction between our web pages and the observant eyes of the browser.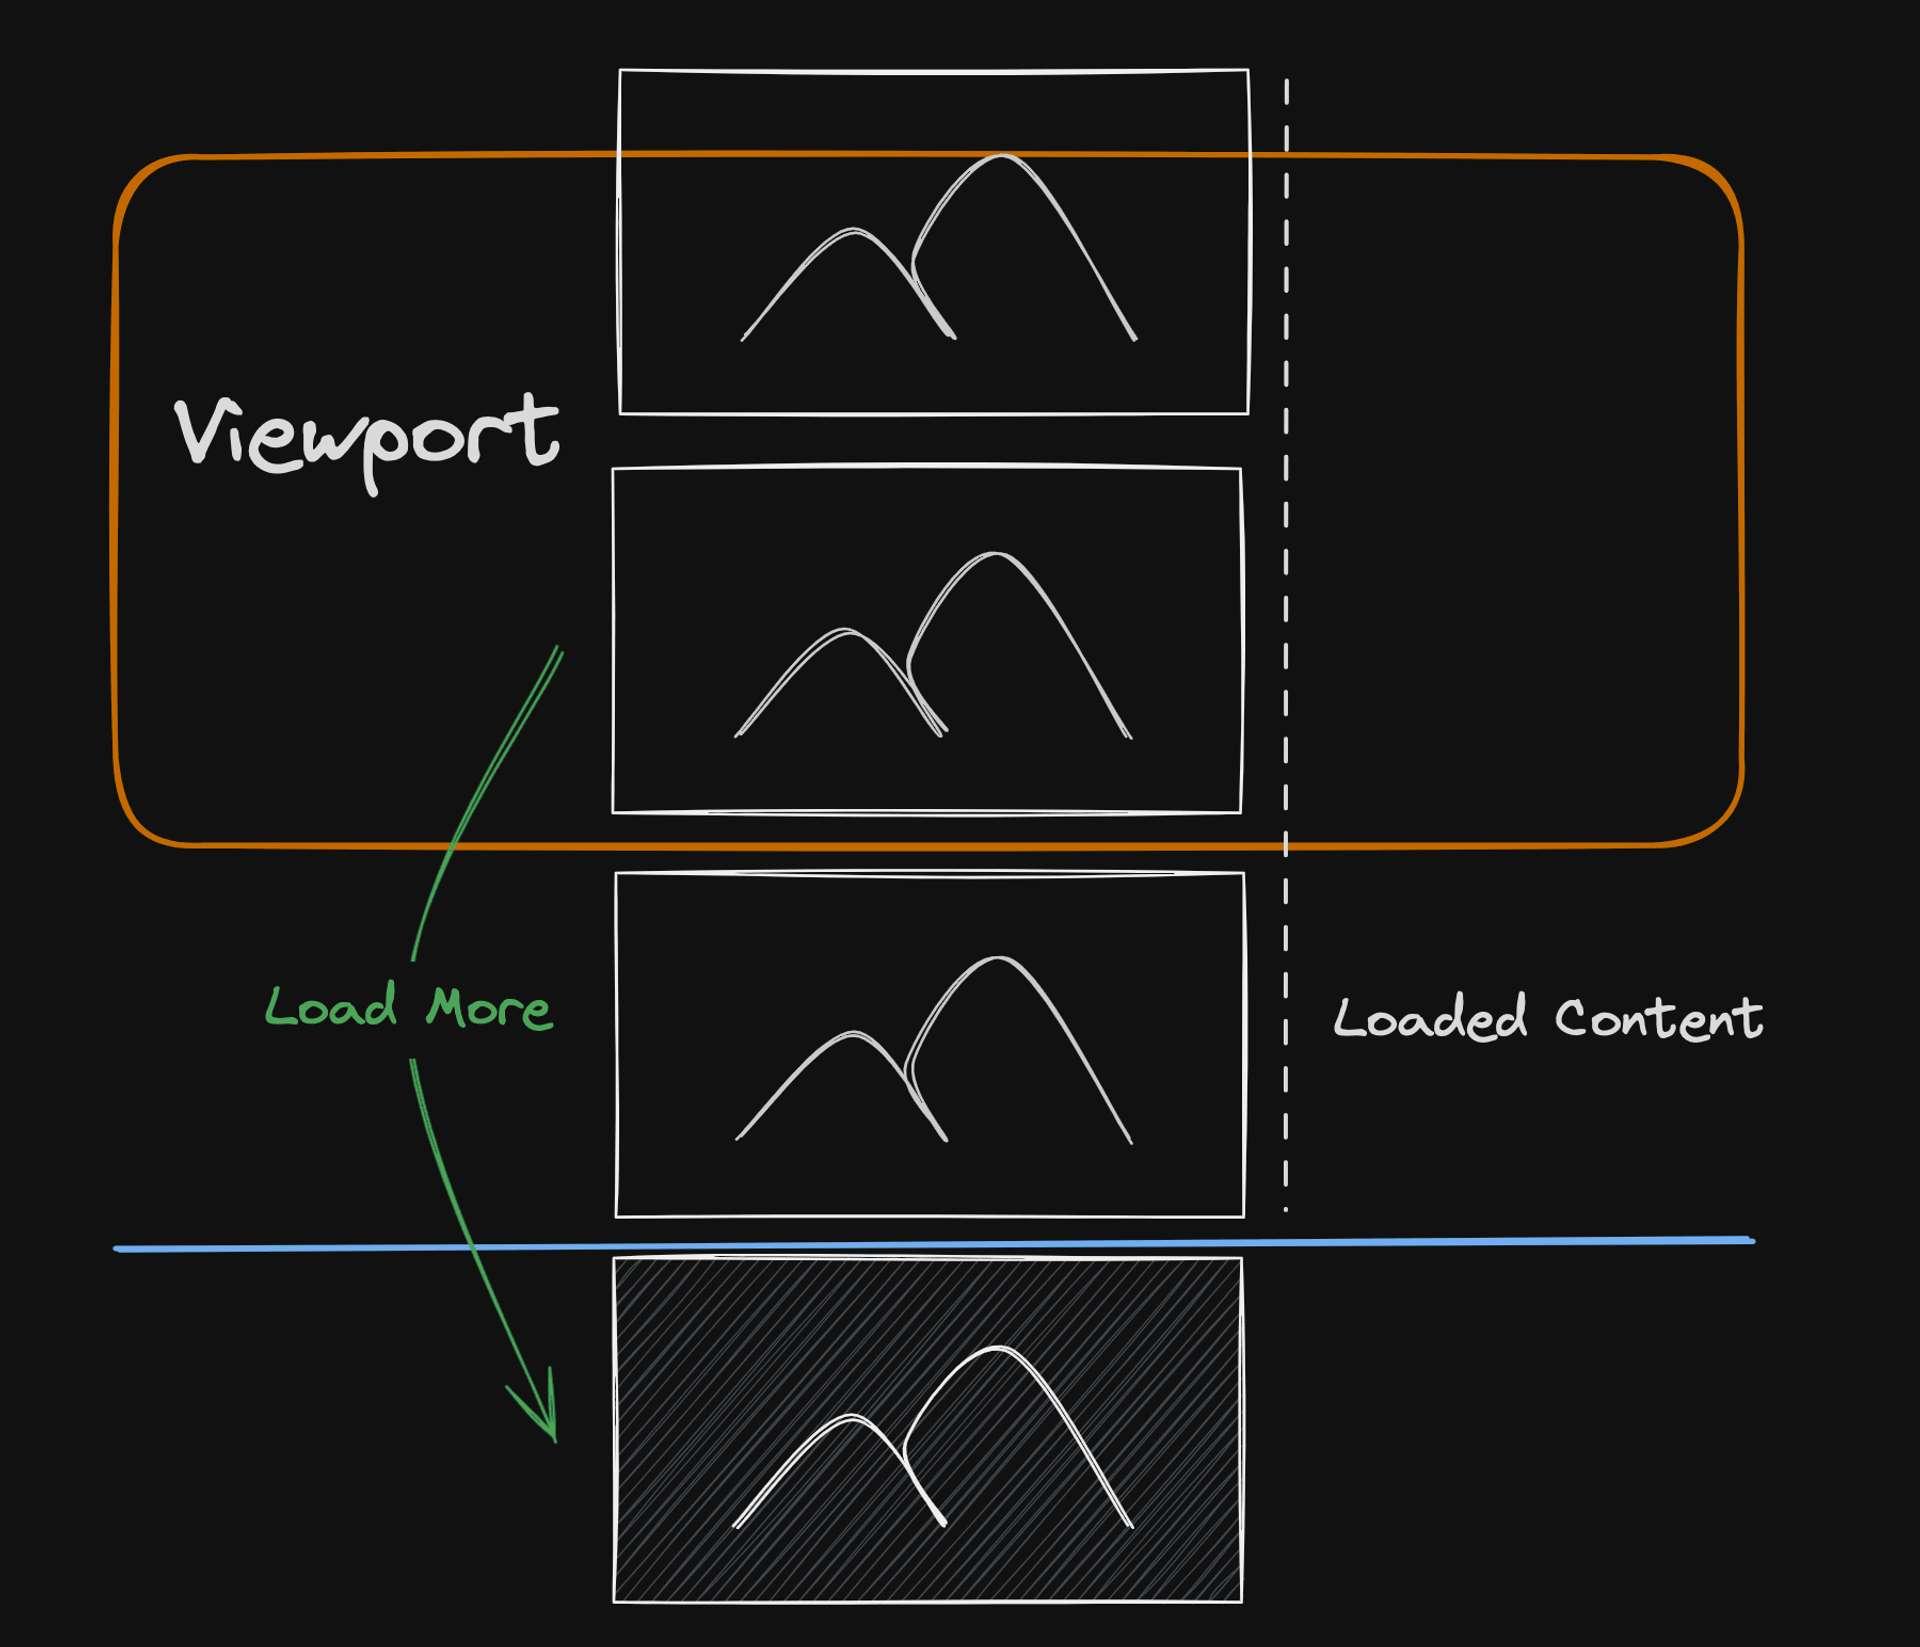
Table of Contents
- Decoding IntersectionObserver: A Deep dive into Root Margin
- Root Margin Demystified: Precision Control Over Intersection Detection
- Crafting the Perfect root Margin: Strategic Optimization Techniques
- Beyond Visibility: Leveraging Root Margin for Enhanced User Experiences
- Best Practices for Implementing Root Margin: Practical Strategies and Considerations
- Q&A
- Insights and Conclusions
Decoding IntersectionObserver: A Deep Dive into Root margin
Let’s unravel the meaning of rootMargin: '200px 0px 200px 0px' within the IntersectionObserver API. Think of the root margin as an adjustable frame of tolerance around the root element (typically the viewport, but it could be any scrollable container). This margin effectively expands or shrinks the area within which the observer detects intersections. In this particular case, we’re adding a 200px buffer at the top and bottom, while leaving the left and right sides untouched. Using this approach you can trigger events before an element actually becomes visible on the screen. This creates opportunities for lazy loading, pre-fetching content, or initiating animations that give a smoother user experience. You are essentially artificially expanding the visible area.
To understand better its impact, consider a few key scenarios. Imagine a series of images you want to lazy load. By declaring rootMargin: '200px 0px 200px 0px', you tell the browser to start loading an image 200 pixels before it actually enters the viewport. In essence, you are adding a head start. This prevents the user from perceiving any loading delays.Here is an unnumbered list of use cases:
- Lazy loading of images: Trigger image loading ahead of time.
- Triggering animations: Start subtle animations before the user sees the element.
- Infinite scrolling: Load more content smoothly without jarring the user experience.
| Margin Side | Value | Effect |
|---|---|---|
| Top | 200px | Triggers 200px before top edge hits root |
| Right | 0px | No margin on the right |
| Bottom | 200px | Triggers 200px before bottom edge hits root |
| Left | 0px | No margin on the left |

Root Margin demystified: Precision Control Over Intersection Detection
Ever wondered how websites seem to “know” when to load elements just as they’re about to appear on screen, creating a smooth, performant user experience? The magic frequently enough lies within the IntersectionObserver API, and the key to its fine-grained control is the rootMargin property. Think of it as an invisible border extending beyond (or shrinking within) the root element, influencing when the observer triggers.
Specifying rootMargin: '200px 0px 200px 0px' instructs the browser to trigger the intersection callback 200 pixels before the target element actually enters the viewport. Let’s break down this value further. Using shorthand CSS notation, this translates to:
- Top: 200px
- Right: 0px
- Bottom: 200px
- Left: 0px
Consider this table to visualize different rootMargin values and their effect:
| rootMargin | effect |
|---|---|
'0px' |
Standard intersection. |
'100px' |
Triggers 100px before entering. |
'-50px' |
Triggers 50px after entering. |
Crafting the Perfect Root Margin: Strategic Optimization techniques
Imagine the viewport as a stage and your elements as actors waiting for their cue. The rootMargin is your stage manager, ensuring the actors are ready before they actually step into the spotlight. Defining it precisely, like in our exmaple, rootMargin: '200px 0px 200px 0px', creates an invisible boundary 200 pixels outside the root element (typically the viewport) on the top and bottom, but perfectly aligned on the sides. This means your elements trigger the Intersection Observer 200px before they would normally be visible,allowing you to preload content,trigger animations,or implement other performance optimizations seamlessly.
But strategic optimization involves more than just setting a static value. You need to consider your content layout, device breakpoints, and desired interaction effect. Here are some key considerations:
- Responsive Design: Adapt your
rootMarginfor different screen sizes to maintain consistent user experience. - Content Height: Ensure your margin is large enough to provide sufficient loading time for taller elements.
- Performance: Avoid excessively large margins that trigger observers prematurely and impact performance.
Here’s a fast look at some common scenarios and suggested approaches:
| Scenario | Suggested rootMargin Adjustment |
|---|---|
| Lazy-loading images in a gallery. | '100px 0px' (preload slightly before view). |
| Triggering a fade-in animation for text. | '-50px 0px' (trigger shortly after entering view). |
| Infinite scrolling content. | '200px 0px' (load next chunk of content early). |
Beyond Visibility: Leveraging Root Margin for Enhanced User Experiences
Ever encountered situations where elements pop into view a tad to late,disrupting the flow of your website? Or perhaps you’re aiming for a smoother,more anticipated reveal that feels less abrupt?
the rootMargin property of the Intersection Observer API is your secret weapon. This CSS-like value is a clever way to adjust the bounding box used for intersections, essentially giving your elements a ‘heads-up’ before they officially become visible. Imagine it as a buffer zone:
- Positive Values: Expand the observer’s area, triggering the callback earlier.
- Negative Values: Shrink the observer’s area,delaying the callback.
Specifically, rootMargin: '200px 0px 200px 0px'; introduces a 200px buffer above and below the root element (typically the viewport), while applying no margin to the sides. This is a game-changer when you want elements to start loading images or trigger animations 200 pixels before they actually scroll into the visible area. Here, let’s see different practical applications:
| Scenario | Result |
|---|---|
| Lazy Loading Images | images load before becoming visible. |
| Triggering Animations | Animations start smoothly, no sudden jumps. |

Best Practices for Implementing Root Margin: Practical Strategies and Considerations
Let’s dissect that intriguing rootMargin: '200px 0px 200px 0px'. This snippet, often nestled within Intersection Observer configurations, defines an invisible boundary around your viewport (or a specified root element). But how do we wield this power responsibly? The key lies in strategic request:
- lazy-loading images: Trigger image loading before they visually enter the viewport, ensuring a seamless user experience. A carefully chosen root margin pre-fetches images just in time.
- infinite scrolling: Load the next batch of content before the user reaches the actual end of the page. this hides loading times.
- Animating elements: Kick off animations as an element approaches, rather than precisely when it’s fully visible. This makes the visuals more appealing.
Navigating the nuances of root margin requires considering a few vital elements.performance is paramount: overly generous margins can trigger observers excessively, impacting page load times. Responsiveness dictates that fixed values (‘200px’) might be unsuitable across devices; consider using viewport units (vw,vh) for dynamic scaling. Testing various viewport sizes ensures a consistent experience. A well-considered negative root margin can hide the animations from elements that are initially inside the viewport.
| Scenario | Root Margin Suggestion | Reasoning |
|---|---|---|
| Fast Animations | -50px 0px -50px 0px | start animations a bit sooner |
| Slow Animations | -200px 0px -200px 0px | Start animations with anticipation |
| Lazy load Images | 200px 0px 200px 0px | Pre-load images for swift display |

Q&A
Decoding the Magic: Intersection Observer API and Its Secret Ingredient – ”rootMargin: ‘200px 0px 200px 0px'”
Intrigued by the power of lazy loading and animations triggered by scroll? You’ve likely stumbled upon the Intersection Observer API. But what’s this “rootMargin: ‘200px 0px 200px 0px'” buisness you keep seeing? Fear not,fellow developer,for we’re about to unravel its secrets in this illuminating Q&A!
Q: okay,first things first. What is rootMargin anyway? It sounds kind of like gardening.
A: You’re not entirely wrong! think of the “root” as the boundary where we’re observing. Usually, this is the viewport (browser window). Now, the rootMargin acts like a buffer zone around that boundary. It allows you to widen or shrink the area that the Intersection Observer considers to be “within view.” Think of it like adding a generous, or perhaps not so generous, flower bed around your garden plot.
Q: So, in the example “rootMargin: ‘200px 0px 200px 0px'”, what does each value represent? It looks like some sort of secret code.
A: Precisely! It uses the shorthand familiar to CSS’s margin property: top right bottom left. So, in this case, we have:
200px: Top margin – the observation area extends 200 pixels above the root.
0px: Right margin – no extra margin on the right side of the root.
200px: Bottom margin – the observation area extends 200 pixels below the root.
0px: Left margin – no extra margin on the left side of the root.
Q: Got it. So, why would I want to use rootMargin like this? What’s the practical application?
A: Imagine you want to trigger a fade-in animation as an element comes into almost view.By using rootMargin: '200px 0px 200px 0px', you’re essentially saying “trigger the animation 200 pixels before the element actually hits the bottom or top edge of the viewport.” This gives the user a smoother, more anticipated experience.It’s like a subtle visual cue, whispering, “Get ready, something awesome is about to happen!”
Q: Okay, I can see the animation benefit. But what about lazy loading images? Wouldn’t it load the image before it’s actually needed, perhaps defeating the purpose?
A: That’s a smart observation! While it’s true the image will load slightly earlier, the 200px buffer allows the image to start loading before the user furiously scrolls into the area where the content is.this helps avoid the dreaded “layout shift,” where elements jump around as images belatedly load in. The 200px buffer ensures the image loading is triggered sooner,making the transition more fluid.
Q: If I set the rootMargin to a negative value,say “-100px 0px -100px 0px”,what happens then?
A: Ah,you’re thinking outside the box! Negative margins,in this context,shrink the observation area. Using “-100px 0px -100px 0px” means the element needs to be 100 pixels more visible (i.e., past the edge of the viewport) before the Intersection Observer triggers. This is useful if you want to ensure something is entirely visible before executing a specific action.
Q: Any final words of wisdom regarding this perplexing but powerful property?
A: Experiment! “rootMargin: ‘200px 0px 200px 0px'” is just a starting point. The beauty of the Intersection Observer API is its flexibility. Play around with different values to find what works best for your specific use case. Combine it with other CSS techniques and JavaScript functionalities to create truly immersive and performant web experiences. Think of it as another brush in your digital art palette!
Insights and Conclusions
So, there you have it. The enigmatic rootMargin: '200px 0px 200px 0px'. More than just a string of pixels and zeroes, it’s a window, an observer, a silent puppeteer controlling precisely when your web elements make their grand entrance on the stage of the viewport. Mastering it is indeed akin to wielding a conductor’s baton, shaping the flow of your user’s visual journey. Go forth and experiment! Let those bottomless scroll sensations wash over you, and may your intersections be ever so… precisely timed.